Wednesday, 15 March 2017

Android Recycler View Example

    Android RecyclerView is more advanced version of ListView with improved performance and other benefits. In this tutorial we are going to learn how to render a simple RecyclerView with a custom layout. We’ll also learn writing a adapter class and row click listener.
    Open build.gradle and add recycler view and card view dependency. Then after rebuild the project.
build.gradle

dependencies {
    compile fileTree(include: ['*.jar'], dir: 'libs')
    compile 'com.android.support:appcompat-v7:25.0.1'
    compile 'com.android.support:design:25.0.1'
    compile 'com.android.support:cardview-v7:25.0.1'
    compile 'com.android.support:recyclerview-v7:25.0.1'
}
    Open res->values->styles.xml and added this below card view style into your styles file.
styles.xml

<resources>

    <style name="AppTheme" parent="Theme.AppCompat.Light.DarkActionBar">
        <item name="colorPrimary">@color/colorPrimary</item>
        <item name="colorPrimaryDark">@color/colorPrimaryDark</item>
        <item name="colorAccent">@color/colorAccent</item>
    </style>

    <style name="CardViewDefault" parent="CardView">
        <item name="cardElevation">3dp</item>
        <item name="contentPadding">5dp</item>
        <item name="android:layout_width">match_parent</item>
        <item name="android:layout_height">wrap_content</item>
        <item name="android:layout_marginTop">5dp</item>
        <item name="android:layout_marginLeft">5dp</item>
        <item name="android:layout_marginRight">5dp</item>
        <item name="android:layout_marginBottom">5dp</item>
    </style>

</resources>
    Open res->layout->activity_main.xml then after added this below line of code into your activity_main.xml file. here main componet is recycler view.
activity_main.xml

<?xml version="1.0" encoding="utf-8"?>
<LinearLayout xmlns:android="http://schemas.android.com/apk/res/android"
    xmlns:tools="http://schemas.android.com/tools"
    android:layout_width="match_parent"
    android:layout_height="match_parent"
    android:orientation="vertical"
    android:background="#e7e7e7"
    tools:context="com.androidsimplifycodes.example.RecyclerView.RecyclerActivity">

    <android.support.v7.widget.RecyclerView
        android:id="@+id/rvSelectItem"
        android:layout_width="match_parent"
        android:layout_height="match_parent"/>

</LinearLayout>
    Create an layout xml named list_item.xml with the below line of code. This layout file renders a single row in recycler view by displaying images into card view.
list_item.xml

<?xml version="1.0" encoding="utf-8"?>
<LinearLayout xmlns:android="http://schemas.android.com/apk/res/android"
    android:layout_width="wrap_content"
    android:layout_height="wrap_content"
    android:orientation="vertical"
    android:padding="10dp">

    <android.support.v7.widget.CardView
        style="@style/CardViewDefault">

        <ImageView
            android:id="@+id/ivImage"
            android:layout_width="wrap_content"
            android:layout_height="300dp"
            android:contentDescription="@null"
            android:scaleType="fitXY"
            android:src="@drawable/img2" />

    </android.support.v7.widget.CardView>

</LinearLayout>
    RecyclerModel is class use for the data storage. For example here stored scale bitmap into this model class.
RecyclerModel.java

package com.androidsimplifycodes.example.RecyclerView;

import android.content.Context;
import android.graphics.Bitmap;
import android.graphics.BitmapFactory;

public class RecyclerModel {

    private Bitmap bitmapResource;

    public Bitmap getBitmapResource() {
        return bitmapResource;
    }

    public void setGetBitmapResource(Context context, int getBitmapResource) {
        this.bitmapResource = Bitmap.createScaledBitmap(
                BitmapFactory.decodeResource(context.getResources(), getBitmapResource),
                500,
                500,
                false);
    }
}
RecyclerAdapter.java

package com.androidsimplifycodes.example.RecyclerView;

import android.content.Context;
import android.support.v7.widget.RecyclerView;
import android.view.LayoutInflater;
import android.view.View;
import android.view.ViewGroup;
import android.widget.ImageView;
import android.widget.Toast;

import com.androidsimplifycodes.example.R;

import java.util.ArrayList;

public class RecyclerAdapter extends RecyclerView.Adapter<RecyclerAdapter.ViewHolder> {

    private Context context;
    private ArrayList<RecyclerModel> list;

    RecyclerAdapter(Context context, ArrayList<RecyclerModel> list) {
        // give reference to the Activity context and list into the adapter
        this.context = context;
        this.list = list;
    }

    @Override
    public RecyclerAdapter.ViewHolder onCreateViewHolder(ViewGroup parent, int viewType) {
        return new ViewHolder(LayoutInflater.from(context).inflate(R.layout.list_item, parent, false));
    }

    @Override
    public void onBindViewHolder(final RecyclerAdapter.ViewHolder holder, int position) {
        holder.ivImage.setImageBitmap(list.get(position).getBitmapResource());

        holder.ivImage.setOnClickListener(new View.OnClickListener() {
            @Override
            public void onClick(View view) {
                // for the displaying the current item position when click.
                Toast.makeText(context, String.valueOf(holder.getAdapterPosition()), Toast.LENGTH_SHORT).show();
            }
        });
    }

    @Override
    public int getItemCount() {
        return list.size();
    }

    class ViewHolder extends RecyclerView.ViewHolder {

        ImageView ivImage;

        ViewHolder(View itemView) {
            super(itemView);
            initView(itemView);
        }

        private void initView(View rootView) {
            ivImage = (ImageView) rootView.findViewById(R.id.ivImage);
        }
    }
}
RecyclerActivity.java

package com.androidsimplifycodes.example.RecyclerView;

import android.os.Bundle;
import android.support.v7.app.AppCompatActivity;
import android.support.v7.widget.LinearLayoutManager;
import android.support.v7.widget.RecyclerView;

import com.androidsimplifycodes.example.R;

import java.util.ArrayList;

public class RecyclerActivity extends AppCompatActivity {

    protected RecyclerView rvSelectItem;
    protected ArrayList<RecyclerModel> list;
    protected RecyclerModel recyclerModel;

    @Override
    protected void onCreate(Bundle savedInstanceState) {
        super.onCreate(savedInstanceState);
        super.setContentView(R.layout.activity_main);
        initView();

        // initialize array list
        list = new ArrayList<>();

        recyclerModel = new RecyclerModel();
        recyclerModel.setGetBitmapResource(this, R.drawable.img2);
        list.add(recyclerModel);

        recyclerModel = new RecyclerModel();
        recyclerModel.setGetBitmapResource(this, R.drawable.img5);
        list.add(recyclerModel);

        recyclerModel = new RecyclerModel();
        recyclerModel.setGetBitmapResource(this, R.drawable.img4);
        list.add(recyclerModel);

        recyclerModel = new RecyclerModel();
        recyclerModel.setGetBitmapResource(this, R.drawable.img5);
        list.add(recyclerModel);

        recyclerModel = new RecyclerModel();
        recyclerModel.setGetBitmapResource(this, R.drawable.img2);
        list.add(recyclerModel);

        recyclerModel = new RecyclerModel();
        recyclerModel.setGetBitmapResource(this, R.drawable.img4);
        list.add(recyclerModel);

        // LinearLayoutManager user for set Recycler View HORIZONTAL Or VERTICAL
        // for example LinearLayoutManager.VERTICAL Or LinearLayoutManager.HORIZONTAL
        LinearLayoutManager manager = new LinearLayoutManager(RecyclerActivity.this, LinearLayoutManager.HORIZONTAL, false);
        rvSelectItem.setLayoutManager(manager);
        // set Our RecyclerAdapter into setAdapter() method.
        rvSelectItem.setAdapter(new RecyclerAdapter(this, list));
    }

    private void initView() {
        rvSelectItem = (RecyclerView) findViewById(R.id.rvSelectItem);
    }
}
Output :


Tuesday, 14 March 2017

Android ListView Example

    Android listview is view we can use for to set your data into vertically fashion one by one item element with customizable xml.
activity_main.xml

<?xml version="1.0" encoding="utf-8"?>
<LinearLayout xmlns:android="http://schemas.android.com/apk/res/android"
    xmlns:tools="http://schemas.android.com/tools"
    android:layout_width="match_parent"
    android:layout_height="match_parent"
    android:orientation="vertical"
    tools:context="com.androidsimplifycodes.example.MainActivity">

    <ListView
        android:id="@+id/lvList"
        android:layout_width="wrap_content"
        android:layout_height="wrap_content"/>

</LinearLayout>
    This xml file bind with adapter and adapter dynamically set data into this view for example in our case TextView. In sort number of copy will be generated into run time memory when you call adapter.
list_item.xml

<?xml version="1.0" encoding="utf-8"?>
<LinearLayout xmlns:android="http://schemas.android.com/apk/res/android"
    android:layout_width="match_parent"
    android:layout_height="wrap_content">

    <TextView
        android:id="@+id/tvText"
        android:layout_width="match_parent"
        android:layout_height="wrap_content"
        android:padding="10dp"
        android:textAppearance="?android:textAppearanceLarge" />

</LinearLayout>
    ListModel is class use for the storage it means using new operator generate new object and using this object set data into this object but question arise how can we stored this objects? For the storing this object so may technique but here i want to use array list.
ListModel.java

package com.androidsimplifycodes.example.ListView;

public class ListModel {

    private String text;

    public String getText() {
        return text;
    }

    public void setText(String text) {
        this.text = text;
    }
}
ListViewAdapter.java

package com.androidsimplifycodes.example.ListView;

import android.content.Context;
import android.view.LayoutInflater;
import android.view.View;
import android.view.ViewGroup;
import android.widget.BaseAdapter;
import android.widget.TextView;

import com.androidsimplifycodes.example.R;

import java.util.ArrayList;

public class ListViewAdapter extends BaseAdapter {

    private Context context;
    private ArrayList list;

    // passing the objects array list
    public ListViewAdapter(Context context, ArrayList list) {
        this.context = context;
        this.list = list;
    }

    @Override
    public int getCount() {
        return list.size();
    }

    @Override
    public Object getItem(int i) {
        return list.get(i);
    }

    @Override
    public long getItemId(int i) {
        return i;
    }

    @Override
    public View getView(int i, View convertView, ViewGroup viewGroup) {

        ViewHolder holder;
        // this condition only first time true because when adapter call that 
        // time your View is null so fist we bind xml file then after using ViewHolder 
        // bind views.
        if (convertView == null) {
            // bind your list_item.xml here 
            convertView = LayoutInflater.from(context).inflate(R.layout.list_item, viewGroup, false);
            holder = new ViewHolder(convertView);
            // if you not set holder into View then each and every time fist bind xml
            // then after make ViewHolder calls
            convertView.setTag(holder);
        } else {
            holder = (ViewHolder) convertView.getTag();
        }

        holder.tvText.setText(list.get(i).getText());

        return convertView;
    }

    // this class use for the memory utilization for example one time your 
    // xml view bind with java using findViewById then stored into ViewHolder
    // using setTag method. Here question arise but why required this procedure
    // because at run time each and every time not bind your xml view with adapter
    // it will be provide memory utilization and scrolling speed to the View.
    private static class ViewHolder {
        TextView tvText;

        ViewHolder(View rootView) {
            initView(rootView);
        }

        private void initView(View rootView) {
            tvText = (TextView) rootView.findViewById(R.id.tvText);
        }
    }
}
MainActivity.java

package com.androidsimplifycodes.example;

import android.content.Context;
import android.os.Bundle;
import android.support.v7.app.AppCompatActivity;
import android.widget.ListView;

import com.androidsimplifycodes.example.ListView.ListModel;
import com.androidsimplifycodes.example.ListView.ListViewAdapter;

import java.util.ArrayList;

public class MainActivity extends AppCompatActivity {

    protected Context context;
    protected ListView lvList;
    protected ArrayList list;
    protected ListModel model;

    @Override
    protected void onCreate(Bundle savedInstanceState) {
        super.onCreate(savedInstanceState);
        super.setContentView(R.layout.activity_main);

        context = MainActivity.this;
        initView();

        list = new ArrayList<>();

        model = new ListModel();
        model.setText("ABC");
        list.add(model);

        model = new ListModel();
        model.setText("CDE");
        list.add(model);

        model = new ListModel();
        model.setText("EFG");
        list.add(model);

        model = new ListModel();
        model.setText("GHI");
        list.add(model);

        model = new ListModel();
        model.setText("IJK");
        list.add(model);

        model = new ListModel();
        model.setText("KLM");
        list.add(model);

        lvList.setAdapter(new ListViewAdapter(this, list));
    }

    private void initView() {
        lvList = (ListView) findViewById(R.id.lvList);
    }
}
Output :

Tuesday, 7 March 2017

Android ExpandableListView With Custom Layout

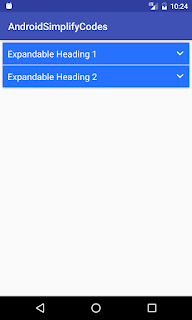
    This two dependency add into your build.gradle file for the CardView. colors add into color.xml file and CardView style CardViewDefault add into style file.
build.gradle (dependency)

compile 'com.android.support:design:25.0.1'
compile 'com.android.support:cardview-v7:25.0.1'
colors.xml

<?xml version="1.0" encoding="utf-8"?>
<resources>
    <color name="colorPrimary">#3F51B5</color>
    <color name="colorPrimaryDark">#303F9F</color>
    <color name="colorAccent">#FF4081</color>

    <color name="color_blue">#2672FF</color>
</resources>
styles.xml

<resources>

    <style name="AppTheme" parent="Theme.AppCompat.Light.DarkActionBar">
        <item name="colorPrimary">@color/colorPrimary</item>
        <item name="colorPrimaryDark">@color/colorPrimaryDark</item>
        <item name="colorAccent">@color/colorAccent</item>
    </style>

    <style name="CardViewDefault" parent="CardView">
        <item name="cardElevation">3dp</item>
        <item name="contentPadding">5dp</item>
        <item name="android:layout_width">match_parent</item>
        <item name="android:layout_height">wrap_content</item>
        <item name="android:layout_marginTop">5dp</item>
        <item name="android:layout_marginLeft">5dp</item>
        <item name="android:layout_marginRight">5dp</item>
        <item name="android:layout_marginBottom">5dp</item>
    </style>

</resources>
activity_main.xml

<?xml version="1.0" encoding="utf-8"?>
<LinearLayout xmlns:android="http://schemas.android.com/apk/res/android"
    xmlns:app="http://schemas.android.com/apk/res-auto"
    xmlns:tools="http://schemas.android.com/tools"
    android:layout_width="match_parent"
    android:layout_height="match_parent"
    android:gravity="center"
    android:orientation="vertical"
    tools:context="com.androidsimplifycodes.example.MainActivity">

    <ScrollView
        android:layout_width="match_parent"
        android:layout_height="match_parent">

        <LinearLayout
            android:layout_width="match_parent"
            android:layout_height="wrap_content"
            android:orientation="vertical">

            <android.support.v7.widget.CardView
                style="@style/CardViewDefault"
                app:contentPadding="0dp">

                <LinearLayout
                    android:layout_width="match_parent"
                    android:layout_height="match_parent"
                    android:orientation="vertical">

                    <LinearLayout
                        android:id="@+id/llExpandableHeadingOneClick"
                        android:layout_width="match_parent"
                        android:layout_height="wrap_content"
                        android:background="@color/color_blue"
                        android:orientation="horizontal"
                        android:weightSum="1">

                        <TextView
                            android:layout_width="0dp"
                            android:layout_height="match_parent"
                            android:layout_weight="0.9"
                            android:padding="10dp"
                            android:text="Expandable Heading 1"
                            android:textAppearance="?android:textAppearanceMedium"
                            android:textColor="@android:color/white" />

                        <ImageView
                            android:layout_width="0dp"
                            android:layout_height="match_parent"
                            android:layout_gravity="center"
                            android:layout_weight="0.1"
                            android:contentDescription="@null"
                            android:padding="5dp"
                            android:src="@drawable/ic_arrow_down" />

                    </LinearLayout>

                    <LinearLayout
                        android:id="@+id/llExpandableHeadingOne"
                        android:layout_width="match_parent"
                        android:layout_height="wrap_content"
                        android:orientation="vertical"
                        android:padding="5dp">

                        <TextView
                            android:layout_width="match_parent"
                            android:layout_height="wrap_content"
                            android:text="@string/my_text"
                            android:textAppearance="?android:textAppearanceMedium"
                            android:textColor="@android:color/black" />

                    </LinearLayout>

                    <View
                        android:layout_width="match_parent"
                        android:layout_height="1dp"
                        android:background="@android:color/white" />

                    <LinearLayout
                        android:id="@+id/llExpandableHeadingTwoClick"
                        android:layout_width="match_parent"
                        android:layout_height="wrap_content"
                        android:background="@color/color_blue"
                        android:orientation="horizontal"
                        android:weightSum="1">

                        <TextView
                            android:layout_width="0dp"
                            android:layout_height="match_parent"
                            android:layout_weight="0.9"
                            android:padding="10dp"
                            android:text="Expandable Heading 2"
                            android:textAppearance="?android:textAppearanceMedium"
                            android:textColor="@android:color/white" />

                        <ImageView
                            android:layout_width="0dp"
                            android:layout_height="match_parent"
                            android:layout_gravity="center"
                            android:layout_weight="0.1"
                            android:contentDescription="@null"
                            android:padding="5dp"
                            android:src="@drawable/ic_arrow_down" />

                    </LinearLayout>

                    <LinearLayout
                        android:id="@+id/llExpandableHeadingTwo"
                        android:layout_width="match_parent"
                        android:layout_height="wrap_content"
                        android:orientation="vertical"
                        android:padding="5dp">

                        <TextView
                            android:layout_width="match_parent"
                            android:layout_height="wrap_content"
                            android:text="@string/my_text"
                            android:textAppearance="?android:textAppearanceMedium"
                            android:textColor="@android:color/black" />

                    </LinearLayout>

                </LinearLayout>

            </android.support.v7.widget.CardView>

        </LinearLayout>

    </ScrollView>

</LinearLayout>
MainActivity.java

package com.androidsimplifycodes.example;

import android.content.Context;
import android.os.Bundle;
import android.support.v7.app.AppCompatActivity;
import android.view.View;
import android.widget.LinearLayout;

public class MainActivity extends AppCompatActivity {

    protected Context context;
    protected LinearLayout llExpandableHeadingOneClick;
    protected LinearLayout llExpandableHeadingOne;
    protected LinearLayout llExpandableHeadingTwoClick;
    protected LinearLayout llExpandableHeadingTwo;

    @Override
    protected void onCreate(Bundle savedInstanceState) {
        super.onCreate(savedInstanceState);

        super.setContentView(R.layout.activity_main);

        context = MainActivity.this;
        initView();

        Util.collapseView(llExpandableHeadingOne);
        Util.collapseView(llExpandableHeadingTwo);

        llExpandableHeadingOneClick.setTag("Expand");
        llExpandableHeadingTwoClick.setTag("Expand");

        llExpandableHeadingOneClick.setOnClickListener(new View.OnClickListener() {
            @Override
            public void onClick(View view) {
                if (view.getTag().toString().equals("Expand")) {
                    Util.expandView(llExpandableHeadingOne);
                    llExpandableHeadingOneClick.setTag("Collapse");
                } else {
                    Util.collapseView(llExpandableHeadingOne);
                    llExpandableHeadingOneClick.setTag("Expand");
                }
            }
        });

        llExpandableHeadingTwoClick.setOnClickListener(new View.OnClickListener() {
            @Override
            public void onClick(View view) {
                if (view.getTag().toString().equals("Expand")) {
                    Util.expandView(llExpandableHeadingTwo);
                    llExpandableHeadingTwoClick.setTag("Collapse");
                } else {
                    Util.collapseView(llExpandableHeadingTwo);
                    llExpandableHeadingTwoClick.setTag("Expand");
                }
            }
        });
    }

    private void initView() {
        llExpandableHeadingOneClick = (LinearLayout) findViewById(R.id.llExpandableHeadingOneClick);
        llExpandableHeadingOne = (LinearLayout) findViewById(R.id.llExpandableHeadingOne);
        llExpandableHeadingTwoClick = (LinearLayout) findViewById(R.id.llExpandableHeadingTwoClick);
        llExpandableHeadingTwo = (LinearLayout) findViewById(R.id.llExpandableHeadingTwo);
    }
}
    These two function uses for the layout expand and collapse for, expand and Collapse create animation class instance and using interpolated Time multiplied with target height getting new integer value and this value assign for the view expand and collapse.
Util.java

package com.androidsimplifycodes.example;

import android.app.Activity;
import android.content.Context;
import android.view.View;
import android.view.ViewGroup;
import android.view.animation.Animation;
import android.view.animation.Transformation;

/**
 * Created by Kishan Donga on 2/22/2017.
 */

public class Util {

    public static void expandView(final View v) {
        v.measure(ViewGroup.LayoutParams.MATCH_PARENT, ViewGroup.LayoutParams.WRAP_CONTENT);
        final int targetHeight = v.getMeasuredHeight();

        v.getLayoutParams().height = 1;
        v.setVisibility(View.VISIBLE);
        Animation a = new Animation() {
            @Override
            protected void applyTransformation(float interpolatedTime, Transformation t) {
                v.getLayoutParams().height = interpolatedTime == 1
                        ? ViewGroup.LayoutParams.WRAP_CONTENT
                        : (int) (targetHeight * interpolatedTime);
                v.requestLayout();
            }

            @Override
            public boolean willChangeBounds() {
                return true;
            }
        };

        a.setDuration((int) (targetHeight / v.getContext().getResources().getDisplayMetrics().density));
        v.startAnimation(a);
    }

    public static void collapseView(final View v) {
        final int initialHeight = v.getMeasuredHeight();

        Animation a = new Animation() {
            @Override
            protected void applyTransformation(float interpolatedTime, Transformation t) {
                if (interpolatedTime == 1) {
                    v.setVisibility(View.GONE);
                } else {
                    v.getLayoutParams().height = initialHeight - (int) (initialHeight * interpolatedTime);
                    v.requestLayout();
                }
            }

            @Override
            public boolean willChangeBounds() {
                return true;
            }
        };

        a.setDuration((int) (initialHeight / v.getContext().getResources().getDisplayMetrics().density));
        v.startAnimation(a);
    }
}
Output :


Monday, 6 March 2017

Android SharedPreferences Example

 MODE_PRIVATE: the default mode, file accessed withing calling application.
 MODE_WORLD_READABLE: Mode name itself represent this file is not protected so it will be create security holes in applications for the sensitive data.
 MODE_WORLD_WRITEABLE: Mode name itself represent this file is not protected so it will be create security holes in applications for the sensitive data.
 MODE_MULTI_PROCESS: This method will check for modification of preferences even if the Shared Preference instance has already been loaded
 MODE_APPEND: This will append the new preferences data with the already existing preferences data.
 MODE_ENABLE_WRITE_AHEAD_LOGGING: Database open flag. When it is set, it would enable write ahead logging by default

activity_main.xml

<?xml version="1.0" encoding="utf-8"?>
<LinearLayout xmlns:android="http://schemas.android.com/apk/res/android"
    xmlns:tools="http://schemas.android.com/tools"
    android:layout_width="match_parent"
    android:layout_height="match_parent"
    android:gravity="center"
    android:orientation="vertical"
    tools:context="com.androidsimplifycodes.example.MainActivity">

    <LinearLayout
        android:layout_width="match_parent"
        android:layout_height="wrap_content"
        android:orientation="vertical"
        android:padding="20dp">

        <EditText
            android:id="@+id/edText"
            android:layout_width="match_parent"
            android:layout_height="wrap_content"
            android:inputType="text"/>

        <Button
            android:id="@+id/btnSave"
            android:layout_width="wrap_content"
            android:layout_height="wrap_content"
            android:layout_gravity="center"
            android:text="Save" />

    </LinearLayout>

    <TextView
        android:id="@+id/tvStoredData"
        android:layout_width="wrap_content"
        android:layout_height="wrap_content"
        android:text=""
        android:textAppearance="?android:textAppearanceLarge"
        android:textColor="@color/colorAccent" />

</LinearLayout>
MainActivity.java

package com.androidsimplifycodes.example;

import android.content.Context;
import android.content.SharedPreferences;
import android.os.Bundle;
import android.support.v7.app.AppCompatActivity;
import android.view.View;
import android.widget.Button;
import android.widget.EditText;
import android.widget.TextView;
import android.widget.Toast;

public class MainActivity extends AppCompatActivity {

    protected Context context;
    protected SharedPreferences sharedPreferences;
    protected SharedPreferences.Editor editor;
    protected EditText edText;
    protected TextView tvStoredData;
    protected Button btnSave;

    @Override
    protected void onCreate(Bundle savedInstanceState) {
        super.onCreate(savedInstanceState);
        super.setContentView(R.layout.activity_main);

        context = MainActivity.this;
        initView();

        // sharedPreferences used for the storing the data and _Preferences is file name
        // of the sharedPreferences
        sharedPreferences = getSharedPreferences("_Preferences", Context.MODE_PRIVATE);

        // get stored data from the SharedPreferences for the TAG _DATA
        tvStoredData.setText(sharedPreferences.getString("_DATA", "Default String"));

        btnSave.setOnClickListener(new View.OnClickListener() {
            @Override
            public void onClick(View view) {

                editor = sharedPreferences.edit();
                editor.putString("_DATA", edText.getText().toString());
                // commit the changes
                boolean result = editor.commit();
                // if data committed then return true otherwise return false
                if (result) {
                    Toast.makeText(context, "Data Stored into SharedPreferences", Toast.LENGTH_SHORT).show();
                } else {
                    Toast.makeText(context, "Problem Arrive for the storing Data", Toast.LENGTH_SHORT).show();
                }
            }
        });

    }

    private void initView() {
        edText = (EditText) findViewById(R.id.edText);
        tvStoredData = (TextView) findViewById(R.id.tvStoredData);
        btnSave = (Button) findViewById(R.id.btnSave);
    }
}
Output :
Output Same as Default SharedPreferences Example

Thursday, 2 March 2017

How To Draw Triangle In Android

DrawView.java

package com.androidsimplifycodes.example;

import android.content.Context;
import android.graphics.Canvas;
import android.graphics.Color;
import android.graphics.Paint;
import android.graphics.Path;
import android.view.View;

public class DrawView extends View {

    protected Paint paint;

    public DrawView(Context context) {
        super(context);
        initView();
    }

    private void initView() {
        paint = new Paint();
        paint.setAntiAlias(true);
        paint.setStyle(Paint.Style.STROKE);
        paint.setColor(Color.BLUE);
        paint.setStrokeWidth(6f);
    }

    @Override
    protected void onDraw(Canvas canvas) {
        super.onDraw(canvas);
        drawTriangle(getWidth() / 2, getHeight() / 2, 350, canvas, paint);
    }

    public void drawTriangle(int x, int y, int width, Canvas canvas, Paint paint) {
        int halfWidth = width / 2;

        Path path = new Path();
        path.moveTo(x, y - halfWidth);
        path.lineTo(x - halfWidth, y + halfWidth);
        path.lineTo(x + halfWidth, y + halfWidth);
        path.lineTo(x, y - halfWidth);
        path.close();

        canvas.drawPath(path, paint);
    }
}
MainActivity.java

package com.androidsimplifycodes.example;

import android.content.Context;
import android.os.Bundle;
import android.support.v7.app.AppCompatActivity;

public class MainActivity extends AppCompatActivity {

    @Override
    protected void onCreate(Bundle savedInstanceState) {
        super.onCreate(savedInstanceState);
        super.setContentView(new DrawView(this));
    }
}
Output :

Android Default SharedPreferences Example

activity_main.xml

<?xml version="1.0" encoding="utf-8"?>
<LinearLayout xmlns:android="http://schemas.android.com/apk/res/android"
    xmlns:tools="http://schemas.android.com/tools"
    android:layout_width="match_parent"
    android:layout_height="match_parent"
    android:gravity="center"
    android:orientation="vertical"
    tools:context="com.androidsimplifycodes.example.MainActivity">

    <LinearLayout
        android:layout_width="match_parent"
        android:layout_height="wrap_content"
        android:orientation="vertical"
        android:padding="20dp">

        <EditText
            android:id="@+id/edText"
            android:layout_width="match_parent"
            android:layout_height="wrap_content" />

        <Button
            android:id="@+id/btnSave"
            android:layout_width="wrap_content"
            android:layout_height="wrap_content"
            android:layout_gravity="center"
            android:text="Save" />

    </LinearLayout>

    <TextView
        android:id="@+id/tvStoredData"
        android:layout_width="wrap_content"
        android:layout_height="wrap_content"
        android:text=""
        android:textAppearance="?android:textAppearanceLarge"
        android:textColor="@color/colorAccent" />

</LinearLayout>
MainActivity.java

package com.androidsimplifycodes.example;

import android.content.Context;
import android.content.SharedPreferences;
import android.os.Bundle;
import android.preference.PreferenceManager;
import android.support.v7.app.AppCompatActivity;
import android.view.View;
import android.widget.Button;
import android.widget.EditText;
import android.widget.TextView;
import android.widget.Toast;

public class MainActivity extends AppCompatActivity {

    protected Context context;
    protected SharedPreferences sharedPreferences;
    protected SharedPreferences.Editor editor;
    protected EditText edText;
    protected TextView tvStoredData;
    protected Button btnSave;

    @Override
    protected void onCreate(Bundle savedInstanceState) {
        super.onCreate(savedInstanceState);
        super.setContentView(R.layout.activity_main);

        context = MainActivity.this;
        initView();

        // sharedPreferences used for the storing the data
        sharedPreferences = PreferenceManager.getDefaultSharedPreferences(getApplicationContext());

        // get stored data from the SharedPreferences for the TAG _DATA
        tvStoredData.setText(sharedPreferences.getString("_DATA", "Default String"));

        btnSave.setOnClickListener(new View.OnClickListener() {
            @Override
            public void onClick(View view) {

                editor = sharedPreferences.edit();
                editor.putString("_DATA", edText.getText().toString());
                // commit the changes
                boolean result = editor.commit();
                // if data committed then return true otherwise return false
                if (result) {
                    Toast.makeText(context, "Data Stored into SharedPreferences", Toast.LENGTH_SHORT).show();
                } else {
                    Toast.makeText(context, "Problem Arrive for the storing Data", Toast.LENGTH_SHORT).show();
                }
            }
        });

    }

    private void initView() {
        edText = (EditText) findViewById(R.id.edText);
        tvStoredData = (TextView) findViewById(R.id.tvStoredData);
        btnSave = (Button) findViewById(R.id.btnSave);
    }
}
Output :
Here, sharedPreferences _DATA key not have any value so default string return.


String stored into sharedPreferences if successfully then return result true else false. Note : Only commit() function return result so we can use commit() function instead of apply().


Now _DATA key have some value so data will be return by sharedPreferences.


Wednesday, 1 March 2017

Android CheckBox In Option Menu

     Here, one linear layout inside set three child linear layout whenever user make it check or uncheck check box form the option menu then accordingly child linear layout visibility will be changed.
activity_main.xml

<?xml version="1.0" encoding="utf-8"?>
<LinearLayout xmlns:android="http://schemas.android.com/apk/res/android"
    xmlns:tools="http://schemas.android.com/tools"
    android:layout_width="match_parent"
    android:layout_height="match_parent"
    android:orientation="vertical"
    tools:context="com.androidsimplifycodes.example.MainActivity">

    <LinearLayout
        android:id="@+id/llPhone"
        android:layout_width="match_parent"
        android:layout_height="0dp"
        android:layout_weight="1"
        android:gravity="center"
        android:visibility="gone">

        <TextView
            android:layout_width="wrap_content"
            android:layout_height="wrap_content"
            android:text="Phone"
            android:textAppearance="?android:textAppearanceLarge"
            android:textColor="@color/colorAccent" />

    </LinearLayout>

    <LinearLayout
        android:id="@+id/llMail"
        android:layout_width="match_parent"
        android:layout_height="0dp"
        android:layout_weight="1"
        android:gravity="center"
        android:visibility="gone">

        <TextView
            android:layout_width="wrap_content"
            android:layout_height="wrap_content"
            android:text="Mail"
            android:textAppearance="?android:textAppearanceLarge"
            android:textColor="@color/colorAccent" />

    </LinearLayout>

    <LinearLayout
        android:id="@+id/llCalender"
        android:layout_width="match_parent"
        android:layout_height="0dp"
        android:layout_weight="1"
        android:gravity="center">

        <TextView
            android:layout_width="wrap_content"
            android:layout_height="wrap_content"
            android:text="Calender"
            android:textAppearance="?android:textAppearanceLarge"
            android:textColor="@color/colorAccent" />

    </LinearLayout>

</LinearLayout>
     In menu.xml file have one xml attribute like android:checkable="true | false" if true then check box will be display into your option menu.
menu.xml

<?xml version="1.0" encoding="utf-8"?>
<menu xmlns:android="http://schemas.android.com/apk/res/android"
    xmlns:app="http://schemas.android.com/apk/res-auto">
    <item
        android:id="@+id/action_phone"
        android:checkable="true"
        android:title="Phone"
        app:showAsAction="never" />
    <item
        android:id="@+id/action_mail"
        android:checkable="true"
        android:title="Mail"
        app:showAsAction="never" />
    <item
        android:id="@+id/action_calender"
        android:checkable="true"
        android:title="Calender"
        app:showAsAction="never" />
</menu>
MainActivity.java

package com.androidsimplifycodes.example;

import android.content.SharedPreferences;
import android.os.Bundle;
import android.preference.PreferenceManager;
import android.support.v7.app.AppCompatActivity;
import android.view.Menu;
import android.view.MenuItem;
import android.view.View;
import android.widget.LinearLayout;

public class MainActivity extends AppCompatActivity {

    protected LinearLayout llPhone;
    protected LinearLayout llMail;
    protected LinearLayout llCalender;
    protected SharedPreferences sharedPreferences;
    protected SharedPreferences.Editor editor;

    @Override
    protected void onCreate(Bundle savedInstanceState) {
        super.onCreate(savedInstanceState);
        super.setContentView(R.layout.activity_main);
        initView();

        // sharedPreferences used for the storing the state of the check box.
        sharedPreferences = PreferenceManager.getDefaultSharedPreferences(getApplicationContext());
        editor = sharedPreferences.edit();
        // by default phone item if you want to make checked then make it true
        editor.putBoolean("phone", false);
        // by default mail item if you want to make checked then make it true
        editor.putBoolean("mail", false);
        // by default calender item if you want to make checked then make it true
        editor.putBoolean("calender", true);
        // commit the changes
        editor.commit();
    }

    @Override
    public boolean onCreateOptionsMenu(Menu menu) {
        getMenuInflater().inflate(R.menu.menu, menu);

        // when menu create then using stored state of the item
        // make checkable or uncheckable item.
        if (sharedPreferences.getBoolean("phone", false)) {
            // findItem id function return the id of the menu
            menu.findItem(R.id.action_phone).setChecked(true);
        } else if (sharedPreferences.getBoolean("mail", false)) {
            menu.findItem(R.id.action_mail).setChecked(true);
        } else if (sharedPreferences.getBoolean("calender", false)) {
            menu.findItem(R.id.action_calender).setChecked(true);
        }

        return true;
    }

    @Override
    public boolean onOptionsItemSelected(MenuItem item) {
        // previously committed editor object never use
        // so we can create new editor reference
        editor = sharedPreferences.edit();
        switch (item.getItemId()) {
            case R.id.action_phone:
                if (item.isChecked()) {
                    llPhone.setVisibility(View.GONE);
                    // make it false because user unchecked item.
                    item.setChecked(false);
                    // checked item now unchecked
                    // so make it false into sharedPreferences
                    editor.putBoolean("phone", false);
                } else {
                    item.setChecked(true);
                    llPhone.setVisibility(View.VISIBLE);
                    editor.putBoolean("phone", true);
                }
                break;
            case R.id.action_mail:
                if (item.isChecked()) {
                    item.setChecked(false);
                    llMail.setVisibility(View.GONE);
                    editor.putBoolean("mail", false);
                } else {
                    item.setChecked(true);
                    llMail.setVisibility(View.VISIBLE);
                    editor.putBoolean("mail", true);
                }
                break;
            case R.id.action_calender:
                if (item.isChecked()) {
                    item.setChecked(false);
                    editor.putBoolean("calender", false);
                    llCalender.setVisibility(View.GONE);
                } else {
                    item.setChecked(true);
                    editor.putBoolean("calender", true);
                    llCalender.setVisibility(View.VISIBLE);
                }
                break;
        }

        // required to commit the changes
        editor.commit();
        return super.onOptionsItemSelected(item);
    }

    private void initView() {
        llPhone = (LinearLayout) findViewById(R.id.llPhone);
        llMail = (LinearLayout) findViewById(R.id.llMail);
        llCalender = (LinearLayout) findViewById(R.id.llCalender);
    }
}
Output :


Android Option Menu Example

    activity_main.xml have simple one linear or relative layout by default. For the icons right click on drawable folder and select New->Vector Asset then after added required icons. android:showAsAction=["ifRoom" | "never" | "withText" | "always" | "collapseActionView"] this one is most important for the displaying your menu with icon into menu bar or action bar. For more information refer developer console.
menu.xml

<?xml version="1.0" encoding="utf-8"?>
<menu xmlns:android="http://schemas.android.com/apk/res/android"
    xmlns:app="http://schemas.android.com/apk/res-auto">
    <item
        android:id="@+id/action_phone"
        android:icon="@drawable/ic_call"
        android:title="Phone"
        app:showAsAction="ifRoom" />
    <item
        android:id="@+id/action_mail"
        android:icon="@drawable/ic_post"
        android:title="Mail"
        app:showAsAction="never" />
    <item
        android:id="@+id/action_calender"
        android:icon="@drawable/ic_calendar"
        android:title="Calender"
        app:showAsAction="never" />
</menu>
MainActivity.java

package com.androidsimplifycodes.example;

import android.os.Bundle;
import android.support.v7.app.AppCompatActivity;
import android.view.Menu;
import android.view.MenuItem;
import android.widget.Toast;

public class MainActivity extends AppCompatActivity {

    @Override
    protected void onCreate(Bundle savedInstanceState) {
        super.onCreate(savedInstanceState);
        super.setContentView(R.layout.activity_main);
    }

    @Override
    public boolean onCreateOptionsMenu(Menu menu) {
        getMenuInflater().inflate(R.menu.menu, menu);
        return super.onCreateOptionsMenu(menu);
    }

    @Override
    public boolean onOptionsItemSelected(MenuItem item) {
        switch (item.getItemId()) {
            case R.id.action_phone:
                Toast.makeText(this, "Phone", Toast.LENGTH_SHORT).show();
                return true;
            case R.id.action_mail:
                Toast.makeText(this, "Mail", Toast.LENGTH_SHORT).show();
                return true;
            case R.id.action_calender:
                Toast.makeText(this, "Calender", Toast.LENGTH_SHORT).show();
                return true;
            default:
                return super.onOptionsItemSelected(item);
        }
    }
}
Output :


Tuesday, 28 February 2017

Popup Menu With Icon In Android

activity_main.xml

<?xml version="1.0" encoding="utf-8"?>
<LinearLayout xmlns:android="http://schemas.android.com/apk/res/android"
    xmlns:tools="http://schemas.android.com/tools"
    android:layout_width="match_parent"
    android:layout_height="match_parent"
    android:gravity="center"
    android:orientation="vertical"
    tools:context="com.androidsimplifycodes.example.MainActivity">

    <Button
        android:id="@+id/btnPopUpMenu"
        android:layout_width="wrap_content"
        android:layout_height="wrap_content"
        android:text="Popup Menu"
        android:textColor="@android:color/black"
        android:textStyle="bold" />

</LinearLayout>
For the icons right click on drawable folder and select New->Vector Asset then after added required icons.
pop_up_menu.xml

<?xml version="1.0" encoding="utf-8"?>
<menu xmlns:android="http://schemas.android.com/apk/res/android">
    <item
        android:id="@+id/action_phone"
        android:icon="@drawable/ic_call"
        android:title="Phone" />
    <item
        android:id="@+id/action_mail"
        android:icon="@drawable/ic_post"
        android:title="Mail" />
    <item
        android:id="@+id/action_add_to_calender"
        android:icon="@drawable/ic_calendar"
        android:title="Calender" />
</menu>
MainActivity.java

package com.androidsimplifycodes.example;

import android.content.Context;
import android.os.Bundle;
import android.support.v7.app.AppCompatActivity;
import android.support.v7.view.menu.MenuBuilder;
import android.support.v7.view.menu.MenuPopupHelper;
import android.support.v7.widget.PopupMenu;
import android.view.MenuItem;
import android.view.View;
import android.widget.Button;
import android.widget.Toast;

public class MainActivity extends AppCompatActivity {

    protected Context context;
    protected Button btnPopUpMenu;

    @Override
    protected void onCreate(Bundle savedInstanceState) {
        super.onCreate(savedInstanceState);
        super.setContentView(R.layout.activity_main);

        context = MainActivity.this;
        initView();

        btnPopUpMenu.setOnClickListener(new View.OnClickListener() {
            @Override
            public void onClick(View view) {

                PopupMenu popupMenu = new PopupMenu(context, view);
                popupMenu.getMenuInflater().inflate(R.menu.pop_up_menu, popupMenu.getMenu());

                popupMenu.setOnMenuItemClickListener(new PopupMenu.OnMenuItemClickListener() {
                    public boolean onMenuItemClick(MenuItem item) {
                        switch (item.getItemId()) {
                            case R.id.action_mail:
                                Toast.makeText(context, item.getTitle(), Toast.LENGTH_SHORT).show();
                                break;
                            case R.id.action_phone:
                                Toast.makeText(context, item.getTitle(), Toast.LENGTH_SHORT).show();
                                break;
                            case R.id.action_add_to_calender:
                                Toast.makeText(context, item.getTitle(), Toast.LENGTH_SHORT).show();
                                break;
                        }
                        return true;
                    }
                });

                MenuPopupHelper menuHelper = new MenuPopupHelper(context, (MenuBuilder) popupMenu.getMenu(), view);
                menuHelper.setForceShowIcon(true);
                menuHelper.show();
            }
        });
    }

    private void initView() {
        btnPopUpMenu = (Button) findViewById(R.id.btnPopUpMenu);
    }
}
Output :

Select Image From Gallery Android

activity_main.xml

<?xml version="1.0" encoding="utf-8"?>
<LinearLayout xmlns:android="http://schemas.android.com/apk/res/android"
    xmlns:tools="http://schemas.android.com/tools"
    android:layout_width="match_parent"
    android:layout_height="match_parent"
    android:layout_weight="1"
    android:orientation="vertical"
    tools:context="com.androidsimplifycodes.example.MainActivity">

    <LinearLayout
        android:layout_width="match_parent"
        android:layout_height="0dp"
        android:layout_weight="0.2"
        android:gravity="center">

        <Button
            android:id="@+id/btnGallery"
            android:layout_width="wrap_content"
            android:layout_height="wrap_content"
            android:text="Gallery"
            android:textColor="@android:color/black"
            android:textStyle="bold" />

    </LinearLayout>

    <RelativeLayout
        android:layout_width="match_parent"
        android:layout_height="0dp"
        android:layout_weight="0.8"
        android:gravity="center"
        android:padding="15dp">

        <ImageView
            android:id="@+id/ivImage"
            android:layout_width="match_parent"
            android:layout_height="match_parent"
            android:contentDescription="@null"
            android:scaleType="fitXY"/>

        <View
            android:layout_width="match_parent"
            android:layout_height="match_parent"
            android:background="@drawable/boarder" />

    </RelativeLayout>

</LinearLayout>
boarder.xml

<?xml version="1.0" encoding="UTF-8"?>
<shape xmlns:android="http://schemas.android.com/apk/res/android">
    <solid android:color="@android:color/transparent" />
    <stroke
        android:width="1.5dip"
        android:color="#000000" />
    <padding
        android:bottom="1dp"
        android:left="1dp"
        android:right="1dp"
        android:top="1dp" />
</shape>
MainActivity.java

package com.androidsimplifycodes.example;

import android.app.Activity;
import android.content.Intent;
import android.database.Cursor;
import android.graphics.Bitmap;
import android.graphics.BitmapFactory;
import android.net.Uri;
import android.os.Bundle;
import android.provider.MediaStore;
import android.support.v7.app.AppCompatActivity;
import android.view.View;
import android.widget.Button;
import android.widget.ImageView;

public class MainActivity extends AppCompatActivity {

    protected Button btnGallery;
    protected ImageView ivImage;

    @Override
    protected void onCreate(Bundle savedInstanceState) {
        super.onCreate(savedInstanceState);
        super.setContentView(R.layout.activity_main);
        initView();

        btnGallery.setOnClickListener(new View.OnClickListener() {
            @Override
            public void onClick(View view) {
                Intent i = new Intent(Intent.ACTION_PICK, MediaStore.Images.Media.EXTERNAL_CONTENT_URI);
                // start activity for result with request code
                startActivityForResult(i, 17);
            }
        });
    }

    @Override
    public void onActivityResult(int requestCode, int resultCode, Intent data) {
        super.onActivityResult(requestCode, resultCode, data);

        if (resultCode == Activity.RESULT_OK && requestCode == 17) {
            // get the data from the getData() method which is return the Uri of the selected image
            Uri uri = data.getData();
            String[] filePath = {MediaStore.Images.Media.DATA};
            // fetch the selected image path using content resolver
            // which is return the object of the cursor
            Cursor cursor = getContentResolver().query(uri, filePath, null, null, null);
            // this one mandatory for the developer to check cursor is null or not
            if (cursor != null) {
                // set the cursor at the first position or move cursor pointer at the beginning
                cursor.moveToFirst();
                int columnIndex = cursor.getColumnIndex(filePath[0]);
                String picturePath = cursor.getString(columnIndex);
                // this one also mandatory for the developer to close the open cursor
                cursor.close();

                BitmapFactory.Options options = new BitmapFactory.Options();
                options.inPreferredConfig = Bitmap.Config.ARGB_8888;
                // required bitmap into ARGB_8888 format
                Bitmap bitmap = BitmapFactory.decodeFile(picturePath, options);
                ivImage.setImageBitmap(bitmap);
            }
        }
    }

    private void initView() {
        btnGallery = (Button) findViewById(R.id.btnGallery);
        ivImage = (ImageView) findViewById(R.id.ivImage);
    }
}
Output :


Android activity as a dialog

Set Dialog theme into your manifest file. Like android:theme="@style/DialogTheme"
AndroidManifest.xml

<?xml version="1.0" encoding="utf-8"?>
<manifest xmlns:android="http://schemas.android.com/apk/res/android"
    package="com.androidsimplifycodes.example">

    <application
        android:allowBackup="true"
        android:icon="@mipmap/ic_launcher"
        android:label="@string/app_name"
        android:supportsRtl="true"
        android:theme="@style/AppTheme">
        <activity android:name=".MainActivity">
            <intent-filter>
                <action android:name="android.intent.action.MAIN" />

                <category android:name="android.intent.category.LAUNCHER" />
            </intent-filter>
        </activity>
        <activity
            android:name=".DialogActivity"
            android:theme="@style/DialogTheme" />
    </application>

</manifest>
Here, define DialogTheme theme added into your style file and set into manifest file. If you not want to use windows title then make true windowNoTitle attribute.
style.xml

<resources>

    <style name="AppTheme" parent="Theme.AppCompat.Light.DarkActionBar">
        <item name="colorPrimary">@color/colorPrimary</item>
        <item name="colorPrimaryDark">@color/colorPrimaryDark</item>
        <item name="colorAccent">@color/colorAccent</item>
    </style>

    <style name="DialogTheme" parent="Theme.AppCompat.Light.Dialog">
        <item name="android:textStyle">bold</item>
        <item name="android:gravity">center_vertical</item>
        <item name="colorPrimary">@color/colorPrimary</item>
        <item name="colorPrimaryDark">@color/colorPrimaryDark</item>
        <item name="colorAccent">@color/colorAccent</item>
        <item name="windowNoTitle">true</item>
    </style>

</resources>
activity_dialog.xml

<?xml version="1.0" encoding="utf-8"?>
<LinearLayout xmlns:android="http://schemas.android.com/apk/res/android"
    xmlns:tools="http://schemas.android.com/tools"
    android:layout_width="300dp"
    android:layout_height="match_parent"
    android:orientation="vertical"
    tools:context="com.androidsimplifycodes.example.MainActivity">

    <TextView
        android:layout_width="match_parent"
        android:layout_height="wrap_content"
        android:background="@android:color/black"
        android:gravity="center"
        android:padding="10dp"
        android:text="Set Title Of the Dialog"
        android:textAppearance="?android:textAppearanceMedium"
        android:textColor="@android:color/white"
        android:textStyle="bold" />

    <LinearLayout
        android:layout_width="match_parent"
        android:layout_height="250dp">

        <TextView
            android:layout_width="match_parent"
            android:layout_height="match_parent"
            android:gravity="center"
            android:text="Hello World!"
            android:textAppearance="?android:textAppearanceLarge"
            android:textColor="@android:color/holo_red_light" />

    </LinearLayout>

    <LinearLayout
        android:layout_width="match_parent"
        android:layout_height="wrap_content"
        android:background="@android:color/darker_gray"
        android:gravity="center"
        android:padding="5dp">

        <Button
            android:layout_width="wrap_content"
            android:layout_height="wrap_content"
            android:text="Ok" />

        <Button
            android:id="@+id/btnCancelDialog"
            android:layout_width="wrap_content"
            android:layout_height="wrap_content"
            android:text="Cancel" />

    </LinearLayout>

</LinearLayout>
DialogActivity.java

package com.androidsimplifycodes.example;

import android.os.Bundle;
import android.support.v7.app.AppCompatActivity;
import android.view.View;
import android.widget.Button;

public class DialogActivity extends AppCompatActivity {

    protected Button btnCancelDialog;

    @Override
    protected void onCreate(Bundle savedInstanceState) {
        super.onCreate(savedInstanceState);
        super.setContentView(R.layout.activity_dialog);
        initView();

        btnCancelDialog.setOnClickListener(new View.OnClickListener() {
            @Override
            public void onClick(View view) {
                finish();
            }
        });
    }

    private void initView() {
        btnCancelDialog = (Button) findViewById(R.id.btnCancelDialog);
    }
}
Output :

Monday, 27 February 2017

Android Capture Image Using Camera

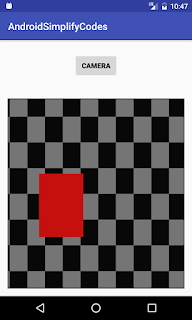
    Add this three permission into your manifest file because we can stored captured image into app cache. but if you use android marshmallow then required run time permission.
AndroidManifest.xml

<?xml version="1.0" encoding="utf-8"?>
<manifest xmlns:android="http://schemas.android.com/apk/res/android"
    package="com.androidsimplifycodes.example">

    <uses-permission android:name="android.permission.CAMERA" />
    <uses-permission android:name="android.permission.WRITE_EXTERNAL_STORAGE" />
    <uses-permission android:name="android.permission.READ_EXTERNAL_STORAGE" />

    <application
        android:allowBackup="true"
        android:icon="@mipmap/ic_launcher"
        android:label="@string/app_name"
        android:supportsRtl="true"
        android:theme="@style/AppTheme">
        <activity android:name="com.androidsimplifycodes.example.MainActivity">
            <intent-filter>
                <action android:name="android.intent.action.MAIN" />

                <category android:name="android.intent.category.LAUNCHER" />
            </intent-filter>
        </activity>
    </application>

</manifest>
activity_main.xml

<?xml version="1.0" encoding="utf-8"?>
<LinearLayout xmlns:android="http://schemas.android.com/apk/res/android"
    xmlns:tools="http://schemas.android.com/tools"
    android:layout_width="match_parent"
    android:layout_height="match_parent"
    android:layout_weight="1"
    android:orientation="vertical"
    tools:context="com.androidsimplifycodes.example.MainActivity">

    <LinearLayout
        android:layout_width="match_parent"
        android:layout_height="0dp"
        android:layout_weight="0.2"
        android:gravity="center">

        <Button
            android:id="@+id/btnCamera"
            android:layout_width="wrap_content"
            android:layout_height="wrap_content"
            android:text="Camera"
            android:textColor="@android:color/black"
            android:textStyle="bold" />

    </LinearLayout>

    <RelativeLayout
        android:layout_width="match_parent"
        android:layout_height="0dp"
        android:layout_weight="0.8"
        android:gravity="center"
        android:padding="15dp">

        <ImageView
            android:id="@+id/ivImage"
            android:layout_width="match_parent"
            android:layout_height="match_parent"
            android:contentDescription="@null"
            android:scaleType="fitXY"/>

        <View
            android:layout_width="match_parent"
            android:layout_height="match_parent"
            android:background="@drawable/boarder" />

    </RelativeLayout>

</LinearLayout>
boarder.xml

<?xml version="1.0" encoding="UTF-8"?>
<shape xmlns:android="http://schemas.android.com/apk/res/android">
    <solid android:color="@android:color/transparent" />
    <stroke
        android:width="1.5dip"
        android:color="#000000" />
    <padding
        android:bottom="1dp"
        android:left="1dp"
        android:right="1dp"
        android:top="1dp" />
</shape>
MainActivity.java

package com.androidsimplifycodes.example;

import android.app.Activity;
import android.content.Intent;
import android.graphics.Bitmap;
import android.graphics.BitmapFactory;
import android.net.Uri;
import android.os.Bundle;
import android.provider.MediaStore;
import android.support.v7.app.AppCompatActivity;
import android.view.View;
import android.widget.Button;
import android.widget.ImageView;

import java.io.File;
import java.io.IOException;

public class MainActivity extends AppCompatActivity {

    protected Button btnCamera;
    protected ImageView ivImage;
    protected File tempFile = null;
    protected String imgPath;
    protected Uri uri;

    @Override
    protected void onCreate(Bundle savedInstanceState) {
        super.onCreate(savedInstanceState);
        super.setContentView(R.layout.activity_main);
        initView();

        btnCamera.setOnClickListener(new View.OnClickListener() {
            @Override
            public void onClick(View view) {
                try {
                    // create temp file into cache with .png extension.
                    tempFile = File.createTempFile("cameraImg", ".png", getExternalCacheDir());
                    // get temp file full path
                    imgPath = tempFile.getAbsolutePath();
                    // your file path should be required to converted into Uri format.
                    uri = Uri.fromFile(tempFile);
                } catch (IOException e) {
                    e.printStackTrace();
                }

                // image capture event set into Intent
                Intent intent = new Intent(MediaStore.ACTION_IMAGE_CAPTURE);
                // captured image stored at given uri
                intent.putExtra(MediaStore.EXTRA_OUTPUT, uri);
                // start activity for result with intent
                // and request code is 13(set according to your requirement)
                startActivityForResult(intent, 13);
            }
        });
    }

    private void initView() {
        btnCamera = (Button) findViewById(R.id.btnCamera);
        ivImage = (ImageView) findViewById(R.id.ivImage);
    }

    @Override
    public void onActivityResult(int requestCode, int resultCode, Intent data) {
        super.onActivityResult(requestCode, resultCode, data);
        if (resultCode == Activity.RESULT_OK && requestCode == 13) {
            BitmapFactory.Options options = new BitmapFactory.Options();
            options.inPreferredConfig = Bitmap.Config.ARGB_8888;
            // get captured image from the cache with preferred configuration is ARGB_8888
            Bitmap bitmap = BitmapFactory.decodeFile(imgPath, options);
            ivImage.setImageBitmap(bitmap);
        }
    }
}
Output :


Custom Toggle Button In Android

activity_main.xml

<?xml version="1.0" encoding="utf-8"?>
<LinearLayout xmlns:android="http://schemas.android.com/apk/res/android"
    xmlns:tools="http://schemas.android.com/tools"
    android:id="@+id/activity_main"
    android:layout_width="match_parent"
    android:layout_height="match_parent"
    android:layout_weight="1"
    android:orientation="vertical"
    tools:context="com.androidsimplifycodes.example.MainActivity">

    <LinearLayout
        android:layout_width="match_parent"
        android:layout_height="0dp"
        android:layout_weight="0.5"
        android:gravity="center"
        android:orientation="horizontal">

        <Button
            android:id="@+id/btnOne"
            android:layout_width="wrap_content"
            android:layout_height="wrap_content"
            android:background="@drawable/toggle_on"
            android:text="Button 1"
            android:textColor="@android:color/white"
            android:textStyle="bold" />

        <Button
            android:id="@+id/btnTwo"
            android:layout_width="wrap_content"
            android:layout_height="wrap_content"
            android:background="@drawable/toggle_off"
            android:text="Button 2"
            android:textColor="@android:color/white"
            android:textStyle="bold" />
    </LinearLayout>

    <LinearLayout
        android:layout_width="match_parent"
        android:layout_height="0dp"
        android:layout_weight="0.5"
        android:gravity="center">

        <TextView
            android:id="@+id/tvSelected"
            android:layout_width="wrap_content"
            android:layout_height="wrap_content"
            android:text="Button One Selected"
            android:textAppearance="?android:textAppearanceLarge"
            android:textColor="@color/colorPrimaryDark"
            android:textStyle="bold" />
    </LinearLayout>

</LinearLayout>
toggle_on.xml

<?xml version="1.0" encoding="utf-8"?>
<layer-list xmlns:android="http://schemas.android.com/apk/res/android">
    <item>
        <shape android:shape="rectangle">
            <stroke
                android:width="5dp"
                android:color="#3876BA" />
        </shape>
    </item>
    <item android:bottom="5dp">
        <shape android:shape="rectangle">
            <solid android:color="#3876BA" />
        </shape>
    </item>
</layer-list>
toggle_off.xml

<?xml version="1.0" encoding="utf-8"?>
<layer-list xmlns:android="http://schemas.android.com/apk/res/android">
    <item>
        <shape android:shape="rectangle">
            <stroke
                android:width="5dp"
                android:color="#4D4D4D" />
        </shape>
    </item>
    <item android:bottom="5dp">
        <shape android:shape="rectangle">
            <solid android:color="#4D4D4D" />
        </shape>
    </item>
</layer-list>
MainActivity.java

package com.androidsimplifycodes.example;

import android.os.Bundle;
import android.support.v7.app.AppCompatActivity;
import android.view.View;
import android.widget.Button;
import android.widget.TextView;

public class MainActivity extends AppCompatActivity {

    protected Button btnOne;
    protected Button btnTwo;
    protected TextView tvSelected;

    @Override
    protected void onCreate(Bundle savedInstanceState) {
        super.onCreate(savedInstanceState);
        super.setContentView(R.layout.activity_main);
        initView();

        btnOne.setOnClickListener(new View.OnClickListener() {
            @Override
            public void onClick(View view) {
                btnOne.setBackgroundResource(R.drawable.toggle_on);
                btnTwo.setBackgroundResource(R.drawable.toggle_off);
                tvSelected.setText("Button One Selected");
            }
        });

        btnTwo.setOnClickListener(new View.OnClickListener() {
            @Override
            public void onClick(View view) {
                btnOne.setBackgroundResource(R.drawable.toggle_off);
                btnTwo.setBackgroundResource(R.drawable.toggle_on);
                tvSelected.setText("Button Two Selected");
            }
        });
    }

    private void initView() {
        btnOne = (Button) findViewById(R.id.btnOne);
        btnTwo = (Button) findViewById(R.id.btnTwo);
        tvSelected = (TextView) findViewById(R.id.tvSelected);
    }
}
Output :


Sunday, 26 February 2017

How To Draw Rectangle In Android Canvas

    Create new Activity and remove R.layout.activity_main instead of set the our custom View class like DrawView into the setContentView() method and also pass the context of the activity into the DrawView constructor.
MainActivity.java

package com.androidsimplifycodes.canvas;

import android.support.v7.app.AppCompatActivity;
import android.os.Bundle;

public class MainActivity extends AppCompatActivity {

    @Override
    protected void onCreate(Bundle savedInstanceState) {
        super.onCreate(savedInstanceState);
        setContentView(new DrawView(this));
    }
}
    Create a new class DrawView extends View. Override the onDraw(Canvas canvas) method to draw rectangle on Canvas. Take the Paint class object for the drawing to the surface of the canvas here use setAntiAlias() function discuss later use of this function and setColor(int color) use for the set color of the rectangle or set color of the STROKE. setStrokeWidth(float width) use for the set boader width of the rectangle.
    If you want to make only bordered rectangle then use STROKE and if you want to use make fill rectangle then use FILL style according to the rectangle syntax we can draw rectangle using three type of methods.

public void drawRect(float left, float top, float right, float bottom, Paint paint);
 Passing float parameter into this function and at last passing the paint object for the drawing.

public void drawRect(Rect r, Paint paint);
 here, use Rect class is container for the store the integer parameter of the left, top, right, bottom of the rectangle.

public void drawRect(RectF rect, Paint paint);
 here, use RectF class is same as above class but store the float parameter of the left, top, right, bottom of the rectangle.
DrawView.java

package com.androidsimplifycodes.canvas;

import android.content.Context;
import android.graphics.Canvas;
import android.graphics.Color;
import android.graphics.Paint;
import android.graphics.Rect;
import android.graphics.RectF;
import android.view.View;

public class DrawView extends View {

    protected Paint paint;
    protected Rect rect;
    protected RectF rectF;

    public DrawView(Context context) {
        super(context);
        initView();
    }

    private void initView() {
        paint = new Paint();
        paint.setAntiAlias(true);
        paint.setStyle(Paint.Style.STROKE);
        paint.setStrokeWidth(6f);

        rect = new Rect(125, 125, 525, 525);
        rectF = new RectF(150.25f, 150.25f, 550.25f, 550.25f);
    }

    @Override
    protected void onDraw(Canvas canvas) {
        super.onDraw(canvas);

        paint.setColor(Color.RED);
        canvas.drawRect(100f, 100f, 500f, 500f, paint);

        paint.setColor(Color.GREEN);
        canvas.drawRect(rect, paint);

        paint.setColor(Color.BLUE);
        canvas.drawRect(rectF, paint);
    }
}
Output :